Roundabout Danger Zones Explained Simply (ADI Part 3 Guide)

Table of Contents
- What Is the Roundabout Danger Zone?
- Roundabout Danger Zone Why This Matters (Especially for ADI Part 3)
- The Key Teaching Question
- Why Learners Misjudge Gaps
- Linking Danger Zones to Observations
- Real-World Example
- Common Mistakes Learners Make
- How to Teach It Effectively
- How This Links to Fault Analysis
- What the Examiner Is Looking For
- Final Thought
- Take This Further
- Related Guides
- FAQs
Roundabout Danger Zones Explained Simply
If your pupil struggles with roundabouts, it usually comes down to one thing: roundabout danger zone
They don’t fully understand when it’s safe to go.
They might look right.
They might see a gap.
But they’re still guessing.
That’s where the roundabout danger zone comes in.
It gives structure to what often feels like a judgement call—and when taught properly, it transforms how pupils approach roundabouts.
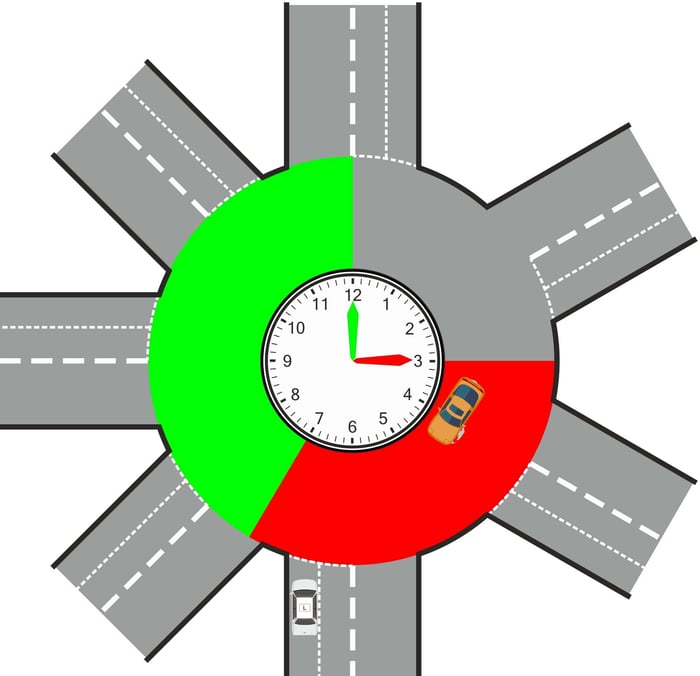
What Is the Roundabout Danger Zone?
The simplest way to explain it is this:
Imagine the roundabout as a clock face.
The danger zone is typically:
From 3 o’clock to 7 o’clock
If a vehicle is in that zone:
There is a strong chance it will cross your path.
Roundabout Danger Zone Why This Matters (Especially for ADI Part 3)
Many learners fall into one of two traps:
❌ Waiting for the roundabout to be completely empty
❌ Going too early because they see a gap
Neither shows understanding.
The danger zone helps you teach:
Priority
Timing
Safer decision-making
And for ADI Part 3, that’s exactly what the examiner is looking for.
The Key Teaching Question
Instead of saying:
“Wait… wait… go now!”
Ask:
“Would that vehicle cross your path?”
If the answer is yes:
It’s not safe to go.
If the answer is no:
The gap may be usable
This shifts the lesson from instruction to thinking.
Why Learners Misjudge Gaps
It’s rarely just confidence.
It’s usually one of these:
Focusing only on vehicles coming from the right
Ignoring direction of travel
Misjudging speed
Relying on signals too much
This is where the danger zone simplifies things.
Linking Danger Zones to Observations
The danger zone only works if the observation routine is correct.
Teach it like a crossroads:
Right → Ahead → Left → Ahead → Right
Why this matters:
Hazards don’t only come from the right
Vehicles can change direction
Pedestrians and crossings may affect movement
You’re building a full picture—not just reacting.
Real-World Example
A vehicle approaches from the right and signals left.
Many learners assume:
“It’s turning off—I can go”
But in reality:
The signal could be late
The signal could be wrong
The vehicle could continue around
So instead of trusting the signal, ask:
“What is the car actually doing?”
This links directly to:
Car first, road second
Common Mistakes Learners Make
Moving as soon as they see space
Hesitating too long and missing safe gaps
Watching one vehicle instead of the full picture
Trusting indicators without confirmation
Each one shows a lack of structured understanding.
How to Teach It Effectively
Keep it simple.
Explain the clockface idea
Identify the danger zone
Ask the key question
Reinforce with real examples
Avoid overloading the pupil.
You’re building awareness—not reciting rules.
How This Links to Fault Analysis
When something goes wrong, don’t just correct it.
Break it down:
What did you see?
What did you think was happening?
What should you look for next time?
This is where you show proper analysis—something heavily marked in ADI Part 3.
What the Examiner Is Looking For
They are not expecting perfect decisions every time.
They are looking for:
Clear understanding
Safe judgement
Structured teaching
Adaptation based on the pupil
If you can demonstrate that, you’re on the right track.
Final Thought
The danger zone is not a strict rule.
It’s a tool to improve judgement.
Once a pupil understands it, roundabouts stop feeling unpredictable—and start making sense.
Take This Further
To build this into a full lesson structure, including:
Step-by-step roundabout teaching
Coaching questions
Fault analysis methods
Explore our full ADI Part 3 training resources
Related Guides
How to Teach Roundabouts (ADI Part 3 Guide)
Blockers on Roundabouts (Full Guide)
Observations at Roundabouts Explained
FAQs
Does the danger zone apply to every roundabout?
It’s a general guide, not a fixed rule. You still need to consider visibility, road layout, and traffic conditions. Adapt it to the situation.
Do I always have to wait if a car is on the roundabout?
No. You only need to wait if that vehicle is likely to cross your path. The danger zone helps you judge this, rather than just reacting to any vehicle on the roundabout.
What if a car is in the danger zone but looks like it’s slowing down?
Don’t assume it will stop or turn off. Always confirm with its position, speed, and behaviour. If there’s any doubt, it’s safer to wait.
Can I rely on indicators to decide if it’s safe to go?
No. Indicators support your decision—they don’t make it. Always back them up with what the vehicle is actually doing.
What’s the simplest way to explain the danger zone to a learner?
Keep it simple. As a guide if the car is between the 3 and 7 position we stop and wait, if the car is before the 3 we should be able to go.
But use it as a guide
Build confidence by practising this on quieter roundabouts first.